Introduction
The walkthrough is accompanied by maps of the various levels of the dungeon. On the maps, the bottom left corner is A1, letters going up the side of the map A to P maximum and numbers along the bottom 1 to 16 maximum. All maps are 16 by 16, although not all areas of all maps are explorable.
Walls on these maps are indicated by black lines. Some walls will let you pass through in one direction. These one-way walls are indicated by thin black lines. Doors are yellow. Tapestries with runes are purple.
As you explore the dungeon you will encounter monsters and other foes. Some encounters are fixed, others random. Once you have the skill Read Tracks, cast this on first entry and mark each purple square as an X on your map. Do the same with True Seeing which will show staircases, doors, teleports and other important items as yellow blocks.
Some monsters carry excellent treasure the first time you find them. These are not always replenished when you go back a second time but it's worth a try! Quest items, as far as I can see, are always replaced should you need a replacement for some reason or another.
Equip yourself with the best lockpick you can find. Only a low level one can be bought, others are gained from fights. I found the best was a blue and kept this in the slot between my character's feet for ease of use.
I have tended to say 'use a blue lockpick' in the solution and on the maps. But I haven't always noted which doors need a lockpick and I gather a blue one isn't actually needed until the Thieves' Den.
Dungeon Entrance
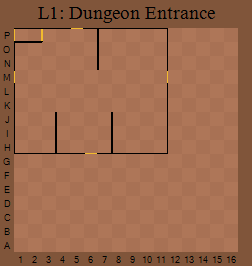
Not much to say about this area. No monsters, no NPCs, no treasure, just four doors. One leads back outside to the Dungeon Exit, one to the Mine, one to the Hall of Doors and the last to the Soldiers' Quarters.
In the top left corner is a locked door which you can't enter until your character is Level 20 or above and has the Thieves' key. This then gives a short cut to The Labyrinth I. All Quest items relating to the Palace are taken from you when you enter, which is worrying, to say the least, when it happens!
The Mines

In this area you will find several rumours. One tells of King Cleowyn's fantastic treasure. Another tells you to look out for better lockpicks and that it is useful to be able to detect hidden doors and traps. A third tells you that the upper levels of the dungeon are the King's Palace and are full of traps. Oh, how true! A wizard tells you that the lower levels of the dungeon are very dangerous and a lone adventurer will be at a disadvantage - also true, but not very useful info when you are playing a solo game! Another character will tell you that to reach the next level of the dungeon you'll need a special key which is located on this level. You'll also be warned about the pit in the centre of the mine which only the strongest can survive.
A central corridor leads from the doorway to the Dungeon Entrance, to the south, to the Vestibule to the east. Some doors are locked and need a lockpick, others are opened by brute strength (17 upwards).
A doorway in the southeast at E14 leads to the pit we were warned about. Ignore this until you are a high level - say Level 20. Fortunately a kind spirit will rescue you if you try to jump into it too soon. It leads to the Pit Bottom.
Another doorway in the northeast at K14 takes you through a series of rooms. At N6, you will fight to win King Cleowyn's Key which is needed to unlock a nearby door and will be used extensively on lower levels. Further through, at G2, another fight will gain you King Cleowyn's Lockpick, which will also be useful later.
Cast detect in the southeast (B14) to find a secret wall. In here, a teleport can only be used by Level 20 characters upwards and takes you to the Thieves' Den.
The Soldiers' Quarters
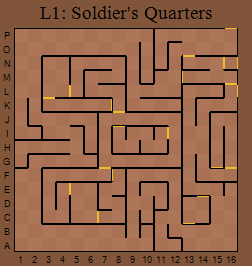
Reached from the Dungeon Entrance, you can reach the Treasury from here and, later, the Basement and beyond. In fact, it turns into a useful short cut. It is also a route back from The Prison using two teleports in a hidden area in the bottom right. You arrive at C13, then go through D14 to reach M13 (and vice versa to reach the Prison).
You'll learn from NPCs that you can acquire new skills in the dungeon. You'll also be told that under Cleowyn's Palace is a maze infested with thieves. They seem the only ones who know how to get through the thing. An orc barbarian will tell you that polar bears and ice lions infest the lower parts of the dungeon and a troll ranger warns you to take heed of the "Keep Out" sign at the end of the corridor and to look out for traps.
Several doors need a lockpick to open them, either green or, better, blue. The central area cannot be reached until you find a teleport at the far east side, G15. Just through the teleport, some dire wolves guard a hollowed nunchukas which will give you some extra cash unless you can use it.
A square corridor around this section has a few rooms off it. One contains some elf barbarians (C5) which often carry worthwhile treasure - I picked up some good magical swords and armour here. A good lockpick is needed for one northern door and another in the south (K3 and C6).
The Hall of Doors
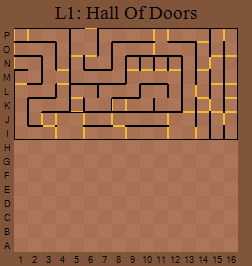
This is a smaller area reached from the Vestibule and the Dungeon Entrance. Once again, only the outer area is immediately accessible. The centre can only be reached by teleport at D16 and there is a locked room past D1 which can be unlocked with a blue lockpick. In here, at E1, is a teleport to the Mausoleum on level 3. A teleport from The Treasury leads to a locked room at C16.
You'll learn that the wizard came to Twinion and caused the volcano to erupt. His castle is buried deep in the bowels of the mountain. A troll cleric tells you someone left a rune on the floor which said that to reach the King's Apartment you must take a turn for the worst. Another NPC tells you scrolls and amulets contain magic here but the magic in them is soon exhausted.
Once you have entered the centre section, you'll find four rooms, each with an encounter, some with very good treasure especially elf clerics and rogues at F9 and goblins with gold coins at F11. A teleport at C5 leads to The Basement.
The Treasury
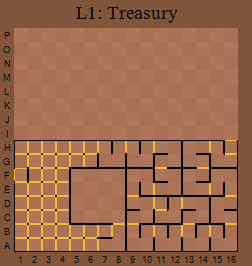
Another smaller area. LOTS of trapdoors in here which will show up with True Seeing. All lead to The Basement, some to an area which can only be reached by this method.
One NPC will tell you that the wizard may have claimed the king's body when he died. Another tells you of a strange area, 2 levels down, with 6 small rooms accessible to everyone but a large area she is unable to reach though a wizard told her to study her runes to solve the mystery of the area. This refers to the Rune Room.
A teleport at H16 leads to the Hall of Doors and a doorway to the Soldiers's Quarters. The central area, reached through the door at B8, contains many monsters so don't tackle it too soon. Many are undead. I used sovereign scrolls to cast Control whenever possible. Other than this, nothing useful here.
The Vestibule
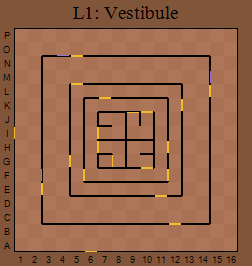
Reached by doors from The Mines and The Hall of Doors. Strange concentric corridors, tapestries, locked doors and four central rooms. An NPC will tell you that you must solve the mystery of the linked vestibule doors to continue further down into the dungeon and another will say that they devised a clever maze of squares to discourage thieves and invaders. An elf cleric says he found nothing in the King's Treasure Room - maybe he missed something - and adds that teleports will speed your way through the dungeon.
Use Read Runes to read the tapestries. One reads 'A hero of strength may open my series of doors' so all you need is sufficient strength to get through. A second says 'A certain lockpick opens my series of doors'. A third says 'A certain key unlocks my series of doors'. These refer, respectively, to Cleowyn's Lockpick and Cleowyn's Key which were found in the Mines. The fourth set of doors can just be opened. The fact is that you can only use one route at any one time. Once one door is opened, all others are impassable. So you need to go through at least four times to reach each central room. It's worth it, though. In one, reached using the Lockpick route, a fight at H10 will gain you the Key to Cleowyn's Palace. In another, the route using Cleowyn's Key, you'll find stairs at G7 to The Palace Corridor. The 'strength' route takes you ultimately to a teleport to The King's Domicile from J9. You can win teleport passes round this area, handy for reaching the shop until you have the Teleport spell.