Labyrinth Route 1 (Continued)
Labyrinth IV - The Drawbridge
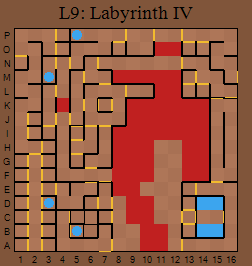
Arriving here at J15 from the shaft in Level 8, you'll find it is a one way route. Where did those rungs go?! Never mind, there are plenty of new areas to explore from here.
Moving north to K15 you'll find a one-way door to Castlegate, a village just outside Arnakkian's Castle. A teleporter near the entrance, at L16, says that of all the Winds, the Tempest is the most violent and dangerous. It takes you to Level 8, L16. The Tempest Winds rip through your armor, causing many wounds down the corridor here, you'll lose 100HP ever move. There is an object to protect you later ... A few rooms hold monsters but nothing too tough. You can teleport back to the Zephyr section at D9, arriving at Level 7, D9. But at E15 you will meet the Tempest Wind. It unleashes its full torrent of winds as you approach, then it reveals its natural form. You will enter a fight with banshees, were minotaurs and the Tempest Wind. Luckily it can be controlled! You'll win the Harvest Horn and this will protect you from the Tempest Wind which caused damage before.
Anyway, back to Castlegate. There are some tough fights here against werebears, hellhounds, gangs of liches and ghouls etc. Past a fight at L9, you meet a barbarian at K8 who tells you 'Andreas built a great pit. Two.' Holding up three fingers he repeats, 'Two, must need two to cross'. At K7 is a room with a teleporter, built by the survivors of the Arnakkian disaster thanks to the generosity of the Mage Council, which takes you to Level 6 by the 'wall that looks strange'. This wall is now the return teleporter, a very useful shortcut.
At I5, loose rocks tumble, revealing a passage beyond. This takes you to Level 10, Elf Villages, 011. We'll go there later.
Wandering along one of the passages which takes you round the top right corner of the map, you'll find the Nightfrost Fountain which restores your mana at M3 and the Dayfrost Fountain which restores your health at P5, and will eventually get to M16 where you will find the entrance to Arnakkian's Arena. More on that later too.
At D7, you'll learn that it is rumoured that a band of dwarves once lived behind the doors of Lookout (is that where we are?). A rune inscription on the wall at C7 reads "We, the Dwarves of NottiRock, seek brightly coloured metals to forge magnificent treasures."
Past the lava is a door and you go through to C5 where there is a hard fight against dragons and Black Knights. Cast Control, then use Poison Cloud on the Dragons and try to survive. The next two locations have similar fights but it is worth continuing because at B5 you find Lookout Fountain where you gain the stamina skill.
There is a teleport to Heaven's Fury at A7 - enter it if you must; it's where Voranti cursed the Winds. You'll arrive at Level 8, A7, and it's a one-way route. In fact, there are a lot of one-way routes here. You'll walk along a corridor and a wall will appear behind you. The Ariel Fountain restores your health at B7 and there is a secret door to detect at C6, going south. The door to Voranti's Passage is at C4 but you need his key to enter. You find this by beating the Dragons of the Leap at Level 7, D14.
Through here you're told that Voranti's Passage is home to Voranti, the Dark Dwarf Thief. Enter the door at B4 to arrive in Level 7, B4. Voranti, some more thieves and a Dragon are at C4, behind a secret door which you find by casting Detect west at C5. Winning this fight gains you an Ace of Spades. This area is full of doors, many of which are fake. At B6 a whirlwind takes half your health - and you'll go through this room a lot! Walk along the edge corridor to the door at J16 which needs the Key to the Back Alley. And at L14 is the doorway to the Labyrinth Back Alley itself, arriving at Level 8, L14.
There are a few one way routes here and from M1 you have to decide whether to go north or south. Going north, past O3 is Trolls End, a dead end apart from a teleport back to Mage's Overlook (M14) at M14. My My Fountain at P3 gives you the Beserker skill while Troll Fountain makes you stronger at O13. A message at N15 passes on a gem of knowledge; to cross the void and challenge En-Li-Kil you must see the rainbow. A note behind a stone at N16 vows death to those who help the Snow Elves and is signed Nasranti, Mage Dwarf. A series of bad fights along the corridor starting from O6 culminates in a biggie at O10. This gives good treasure, in my case Armor of Patience (4000), a Kite Shield (2000) and a War Hammer of Doom (13000). South from M1, at A3 is StoneGiant Fountain where you gain the skill of Athletics.
Past a hard fight against Tyrans and Manticores at E5, go north to enter Heaven's Fury, a cyclone where the forces of Chaos and Harmony meet. At some locations the fury of Hell's Wind causes considerable damage. But at others a peaceful breeze cools your soul. Sometimes these swap - it depends which direction you're walking! Behind the door at L3, in room L2, you gain the Medic skill at Morgard's Fountain. This is a cure skill.
Go through the door at L5 to enter a fight against Hell Wolves, Tyrans and Pincer Cobras.
Again, from the entrance to The Drawbridge, moving down the corridor to B16, you'll find a very hard fight against Tyrans (tyrannosaurs to you and me) and Hellwolves. Once past them and through a door at C12, you'll enter a small room and behind the east wall (though the picture shows a door) you hear rushing water and muffled roars ...
There are dragons at E11 and, at E10, you meet a gnome cleric, the Guardian of the Phoenix. He says the fact that you have passed his dragon guards is proof of your courage. The way is now clear for you to meet the Phoenix. It is time for the Phoenix to die and so be reborn from its own ashes. So, return to the wall and ahead, bounded by the River of Eternity, is the shadow of the Phoenix Firebird. The raging waters of the river look daunting, you're told. So does the fact that the Phoenix is accompanied by Gargoyles and Dragons! Pray that Control works! The Phoenix needs about 5 lots of Blast. Use Poison Cloud on all of them too. When you walk east after the fight, to C15, you feel a sudden increase in your dexterity. Don't bother returning to the Gnome Wizard. He just thanks you for helping his master being reborn and says the Phoenix may no longer be disturbed.
The Great Hall

This, we are told, was a place where, in the days of Arnakkian Slowfoot, the citizens of the Kingdom gathered in festive celebrations. The Great Hall welcomed them with magical games conjured by Arnakkian (he was clearly more fun in those days!).
Oh look, a chess board! That's what greets you almost as soon as you enter. You must make your way across using 'knight moves' and must be carrying the chess piece to do so. Some squares hold fights against chess pieces. At F3 you win a Queen of Spades fighting Pincers Cobras and a Chess Queen, and a King of Spades fighting a Chess King and Were Minotaurs at H4. To get straight across the board, go through the doorway at G2, go forward, turn north, go forward, turn east, go forward, go forward, turn east and go through the doorway at J10. On the other side are two doors. And, at H12 you meet a woman's spirit who invites you to bob for apples and win a prize. But if you do, to I12, you bite into an apple to find it is rotten and enter a fight against lampreys and death leeches. A ghost elf bard at I13 sings a tale of how 4 coloured magical gems placed side by side can form a rainbow to a faraway land.
Well, the door at E12 leads to another confusing section. Behind the door at C12 is a platform with a bottomless pit spanned by a broken bridge. Open each board are the symbols for 10, Jack, Queen and Ace. A voice proclaims, I call your bluff. Use the King of Spades. A Royal Flush beats a Joker and a bridge forms a cross the pit. After you cross, the Poker Bridge collapses.
At E16 a small button shaped like a crescent moon lies just out of reach and a door north proclaims, I am all hearts! Face the button and select the Queen of Spades and the voice says, You shot the moon! You can now go north through the door. At H14, facing west, the Jack throws dust in your direction. Facing south, you're given the message 'The 22nd room of this fine castle ... on the floor is a five, on two walls are fives and the third wall holds a jack. A voice laughs, You stand on face up.' Use the Jack, it scores the hand 22. Cribbage is the game. The door unlocks.
A King guards the wall at I14. You enter a treasure room without any treasure. A dwarf thief voice says, the Kings guard their treasure. Only one can find it. Use the jack to score blackjack and unlock the door. The Blackjack fountain at K14 is made of playing cards and makes you feel healthier and more agile. A voice says the Jack has come home and thanks you for your help. The Jack vanishes from your inventory. If you now return to H14, the door is unlocked. There are Wyverns and Dragons through here. The Cribbage Fountain at F14 restores your Mana and the Ace is returned home.
Back to the doorway at E12. There are one way routes where a wall closes behind you. Beware doors that lead back onto the chess board; you will have to trudge across again. Fights are against gangs of ghosts, not hard at this stage and ghouls which are slightly tougher.
The door at l12 has a sign beside it, at K12 to say a maze made of dice lies just to the north. The door says 'Lucky sevens on the first roll!' when you face it. Inside you'll find a maze of doors. Some have Lucky Seven messages. Some say 'Snake eyes'. Other doors have two squares of silk, 'box cars'. In these are useful messages, some as runes that need translating. Some rooms have fights. Some doors are one way. Some won't open at all!
The middle of the maze has a short corridor, then you enter another maze of the same design. There's an exit at M2, going south (one-way). More messages can be found in 'box car' rooms and you will eventually leave by a corridor down the left side.
The info is as follows:
- To reach En-Li-Kil you must defeat his wind elemental. Remember to use weapons that do not break when the wind elemental attacks.
- Be careful in the River of Eternity. It takes a quarter of your full health each step with no opportunity to heal. A safe fourth square must be found to cross the Rivers of Eternity.
- Use the outer walls to set the location of another's next step in the Parapet Chasm. Once across, encounter Andreas to gain access to Arnakkian.
- Snow Elves live below the labyrinth. The Aldbara is a proud tree in their caves. It bears fruit of knowledge for all adventurers during winter but it lies dormant now, unable to ripen its fruit without the change of seasons and the radiance of summer.
- Use the autumn seeds to transform winter into flowering spring. The promise of spring renewal for another year will be given in return.
- The bones of a past king may be found in the Elven Caves
- The trumpet sound of the Harvest Horn will announce summer's conversion into autumn. From the conversion you will receive the seeds of autumn
- The Waters of Winter are needed to transform Spring into Summer. In return for your deeds you will receive the Radiance of Summer
- The promise of Spring Renewal must be sworn to convert Autumn to Winter. In return you will receive the cold Waters of Winter.